Okay I promise that this one isn't a rant.
I think if I tallied up all the things people have said to me since August, a variation of "How are you?" would come top. "What's the food like in hospital" would come second.
I don't know if it's just because they don't know what else to say to me. Or because they are genuinely interested. If anyone is genuinely interested, while in Birmingham, I took a picture of most (not all- sometimes your too busy or so tired that you just forget) of my meals. Most were provided by the hospital, but if you see a sandwich, that was a supplementation by my parents. Really into cheese salad baguette sandwiches with practically no cheese at the moment. They're good.
Yeah, my across the bay friend and her family did think I was a bit of a nut case at first for taking pictures of everything I ate, but by the end they were quite used to it.
For the most part, each evening they gave you a paper A4 handout sheet with all the options that were available the next day for lunch and dinner, and you ticked what you wanted, including the things to go with it like potatoes and fruit.
There was just one issue I had with the food. They had what was not quite, but pretty much a one week rotating menu. On the Friday, the veggie option at both lunch and tea was a curry (but a different curry) and another day there were two dishes which focused heavily on the cheese. Why not have two days where there's a curry and a cheese? It ain't rocket science people, and I should know, I have an As level in Physics.
The meal's in Birmingham were a lot better than they are in the Christie. Or the veggie fare was at any rate. A lot less emphasis on cheese. Which is good. Complete veggie meals like tomato pasta and curry and rice instead of cheese and onion pie. No one tried to give me fish. (I know, it's amazing). No offence Christie's, but Birmingham won on the food hand's down.
And so...
I must admit, I did eat a lot of chips. I was there for a fortnight though. I also ate a lot of tomato sauce. I think the nurses got a memo to give me a lot of the tomato sauce, because once when a nurse asked me how many of the chips I'd eaten I told her as many as there had been tomato sauce for. She told me that I should have asked for more, and after that I quite often got three or four of those little packets per mealtime. I'm only joking, I think that they were just generally generous. Apart from that one time. Chips seemed to be the cure for everything, easy to eat and pretty much everybody likes them. I did often have chips with stuff as well as on their own, like chips and a sandwich. Now, i don't know that you can see the writing on the back of the tomato sauce packet, but at the bottom of the ingredients list is ketchup spice. And what on earth is ketchup spice?

Yup, I also ate a lot of coco pops. Well- I'm ill. I'm aloud chocolate for breakfast. I had toast once or twice, and frosties once, but apart from that it was coco pops. And actually, my leg twitched while I was holding the frosties, and so I think I threw more over the bed and me than I actually threw in my mouth.
The humble baked potato. The first one was seriously overloaded. Seriously, There was enough sweetcorn and beans for 3 people.
The stuff on toast options. I preferred the spaghetti, but the beans were okay. And I like the fact that it was spaghetti hoops rather than the worms, because they're easier to eat when you're eating it sort of laid down and not at a table, as you sometimes do when you're in hospital.
This was one of my favourite meals, and I got to have it twice. Yippee! Cous cous with roasted vegetables and herbed diced potatoes. Nicer than it sounds, I promise you, and it doesn't exactly sound bad. The cous cous could of had a few more of the roasted vegetables in it, as it was it was more like a flavoursome cous cous with bits in, but it was still so nice. The potatoes were slightly different from week one to week two, but they were yummy, so who's complaining?
Soup and sandwich. Liked the sandwich, not so much the soup.
Aloo Gobi and rice. Aka potato and cauliflower (tomato-y) curry. They could have done with chopping up the cauliflower a bit more. I ended up leaving most of the pieces, as they were a bit overwhelming. And the potato in a tomato-y curry was nice enough as it is.

Tomato and vegetable pasta bake. Very nice, but possibly a bit over baked. Some bits were a bit hard, but like I said, this didn't stop it from being very nice. Also, I think that they'd put cheese on the top when they'd baked it. It was just kind of mixed in when I got it and kind of coagulated in a "slab" as Mom put it when it got to me. A bit like when you have cold pizza, but a bit harder. That made it very easy for me to remove (why spoil a dish which is fine without cheese with an excess of cheese. Save the cheese for when you need it.) but I'm sure that if you liked cheese, there would be a better way to add it to the dish. Or at least serve it up so the topping was actually a topping. It ain't rocket science. I sound like I'm complaining, I'm not, I enjoyed it, I'm just saying...

Apple crumble. Yum. And yum. And yum again. They did give me two portions, and tried to pass it off as one. In a hospital, you'd think they'd pay more stock to Change for Life's warnings on portion control, but no. But yum. Just yum. A bit sweet, but yum.
Mushroom stroganoff.
Paella and chips. Normally, I would not have chips with paella. Paella is pretty much a meal in itself, and if it is lacking a nutritional component of a balanced meal, it is definitely not starch with all the rice in there. But the nurse put them on there. And I am very glad she did, they were needed for muting the heat. Now, I'm all for children having more sophisticated taste buds then children's menu's and advertising generally have the population to believe, but you would think they would serve a mildly heated paella in the children's ward. Cause I am very nearly a fully fledged adult (well... legally at least) and I struggled. I can't remember that paella is normally anywhere near that spicy. As my memory serves, it uses paprika, one of the milder forms of heat. But not that paella.

This, my friends, is the drinks trolley, brought round a bit before tea, where you can have squash added to your water jug, or get a milkshake. If you look closely, you can see the soy milk used to make my soy banana milkshake (pictured below). I made sure to ask the man pushing the trolley if I could take a picture after he had done it, just in case he minded. It was an unnecessary caution, he was just a bit bemused.


The water jug, (which came with many ice cubes, although I do think you could ask for without) plastic beaker and straw. Distributed at least twice a day. By the end of the fortnight, we had learnt to put a paper towel (or a few) under the jug, as there was quite a bit of condensation, but it was nice to have really cold water for a change. Especially if you'd just been to the loo (which was a long way away, especially if you're just learning to walk again, and so was actually a very tiring journey. Think mini marathon). Of course then you just needed it again a bit later. It's a viscous cycle.
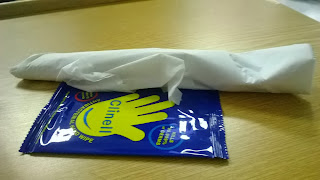
And, ever a hospital, they provided a hand wipe to be used at every meal. That is they provided a new hand wipe at every meal, they didn't want you to keep reusing the same one. They were very suds-y and wet hand wipes, but I'm sure they did a very good job of keeping my hands clean. And yes, they did give us implements to eat are food with.


.jpg)
.jpg)
.jpg)
.jpg)
.jpg)
.jpg)
.jpg)
.jpg)


